Redoing back bath - in progress

I have been doing tons of research on the house and it is very clear that the 2 bed 1 bath addition at the very back of the house has nothing to do with the historic details of the house that we are trying to preserve. For that reason, it will be remodeled in a neutral style in mostly white since it isn't really possible to try and make it match the awesome design and woodwork of the rest of the house.

In general, when doing whole house remodels, it's a good idea to repeat design themes throughout. In this case, some elements from work I've done to the house will be repeated - mainly the 6x6 white tiles in running bond pattern and white track lighting that doesn't make a statement but simply illuminates. I used the white tiles in the kitchen above the red 6x6 pattern so that I could add a vent fan in the kitchen which was much needed. I also added white 6x6 tiles above the old clay tiles in the bathroom to raise the shower head. These white tile surfaces provide a functional surface while blending into the wall and not distracting from the old tile work which is probably from the '20s on the bath floor and the '30s on the wall in the bath and kitchen.

The back bath shower was originally 1/8" Masonite which is pretty odd since it is not an effective moisture barrier. If you know the stuff, it seems about as strong as really good cardboard.

The obvious choice was to do the shower in white 6x6 to continue the theme to unify the design throughout as much as reasonably possible.


The white track light I added has LED bulbs and was also used in the kitchen. It's a flexible system that simply adds light where it's needed. 

The downstairs bath also has unobtrusive white LED lighting in the form of recessed 4" cans. 


One thing that's odd is the bath has '20s plumbing fixtures. I'm still trying to figure out what has happened to this house over the years but the fixtures may be from an earlier upstairs half bath that was removed when the master dressing room was converted to master bath.


The wall sink fits well there so I'll simply shine it up.  The '20s wall tank toilet is a 5 gallon flush and will need to be replaced with a modern toilet. Unfortunately, the closet flange (floor drain) will need to be moved back from 16" to 12".

 
image.jpg
 

Above you can also see the floor was done in a style to mimic the downstairs bath and will be left for now. 

The ceiling is definitely not large timber redwood like the rest of the house and so will simply be painted fresh white as will the rest of the back addition with this ceiling.

 
image.jpg
 

Update:

Back t the toilet... The vent for the toilet is wrong and I have to move back the toilet flange to accommodate a modern toilet so I'm redoing a large section.
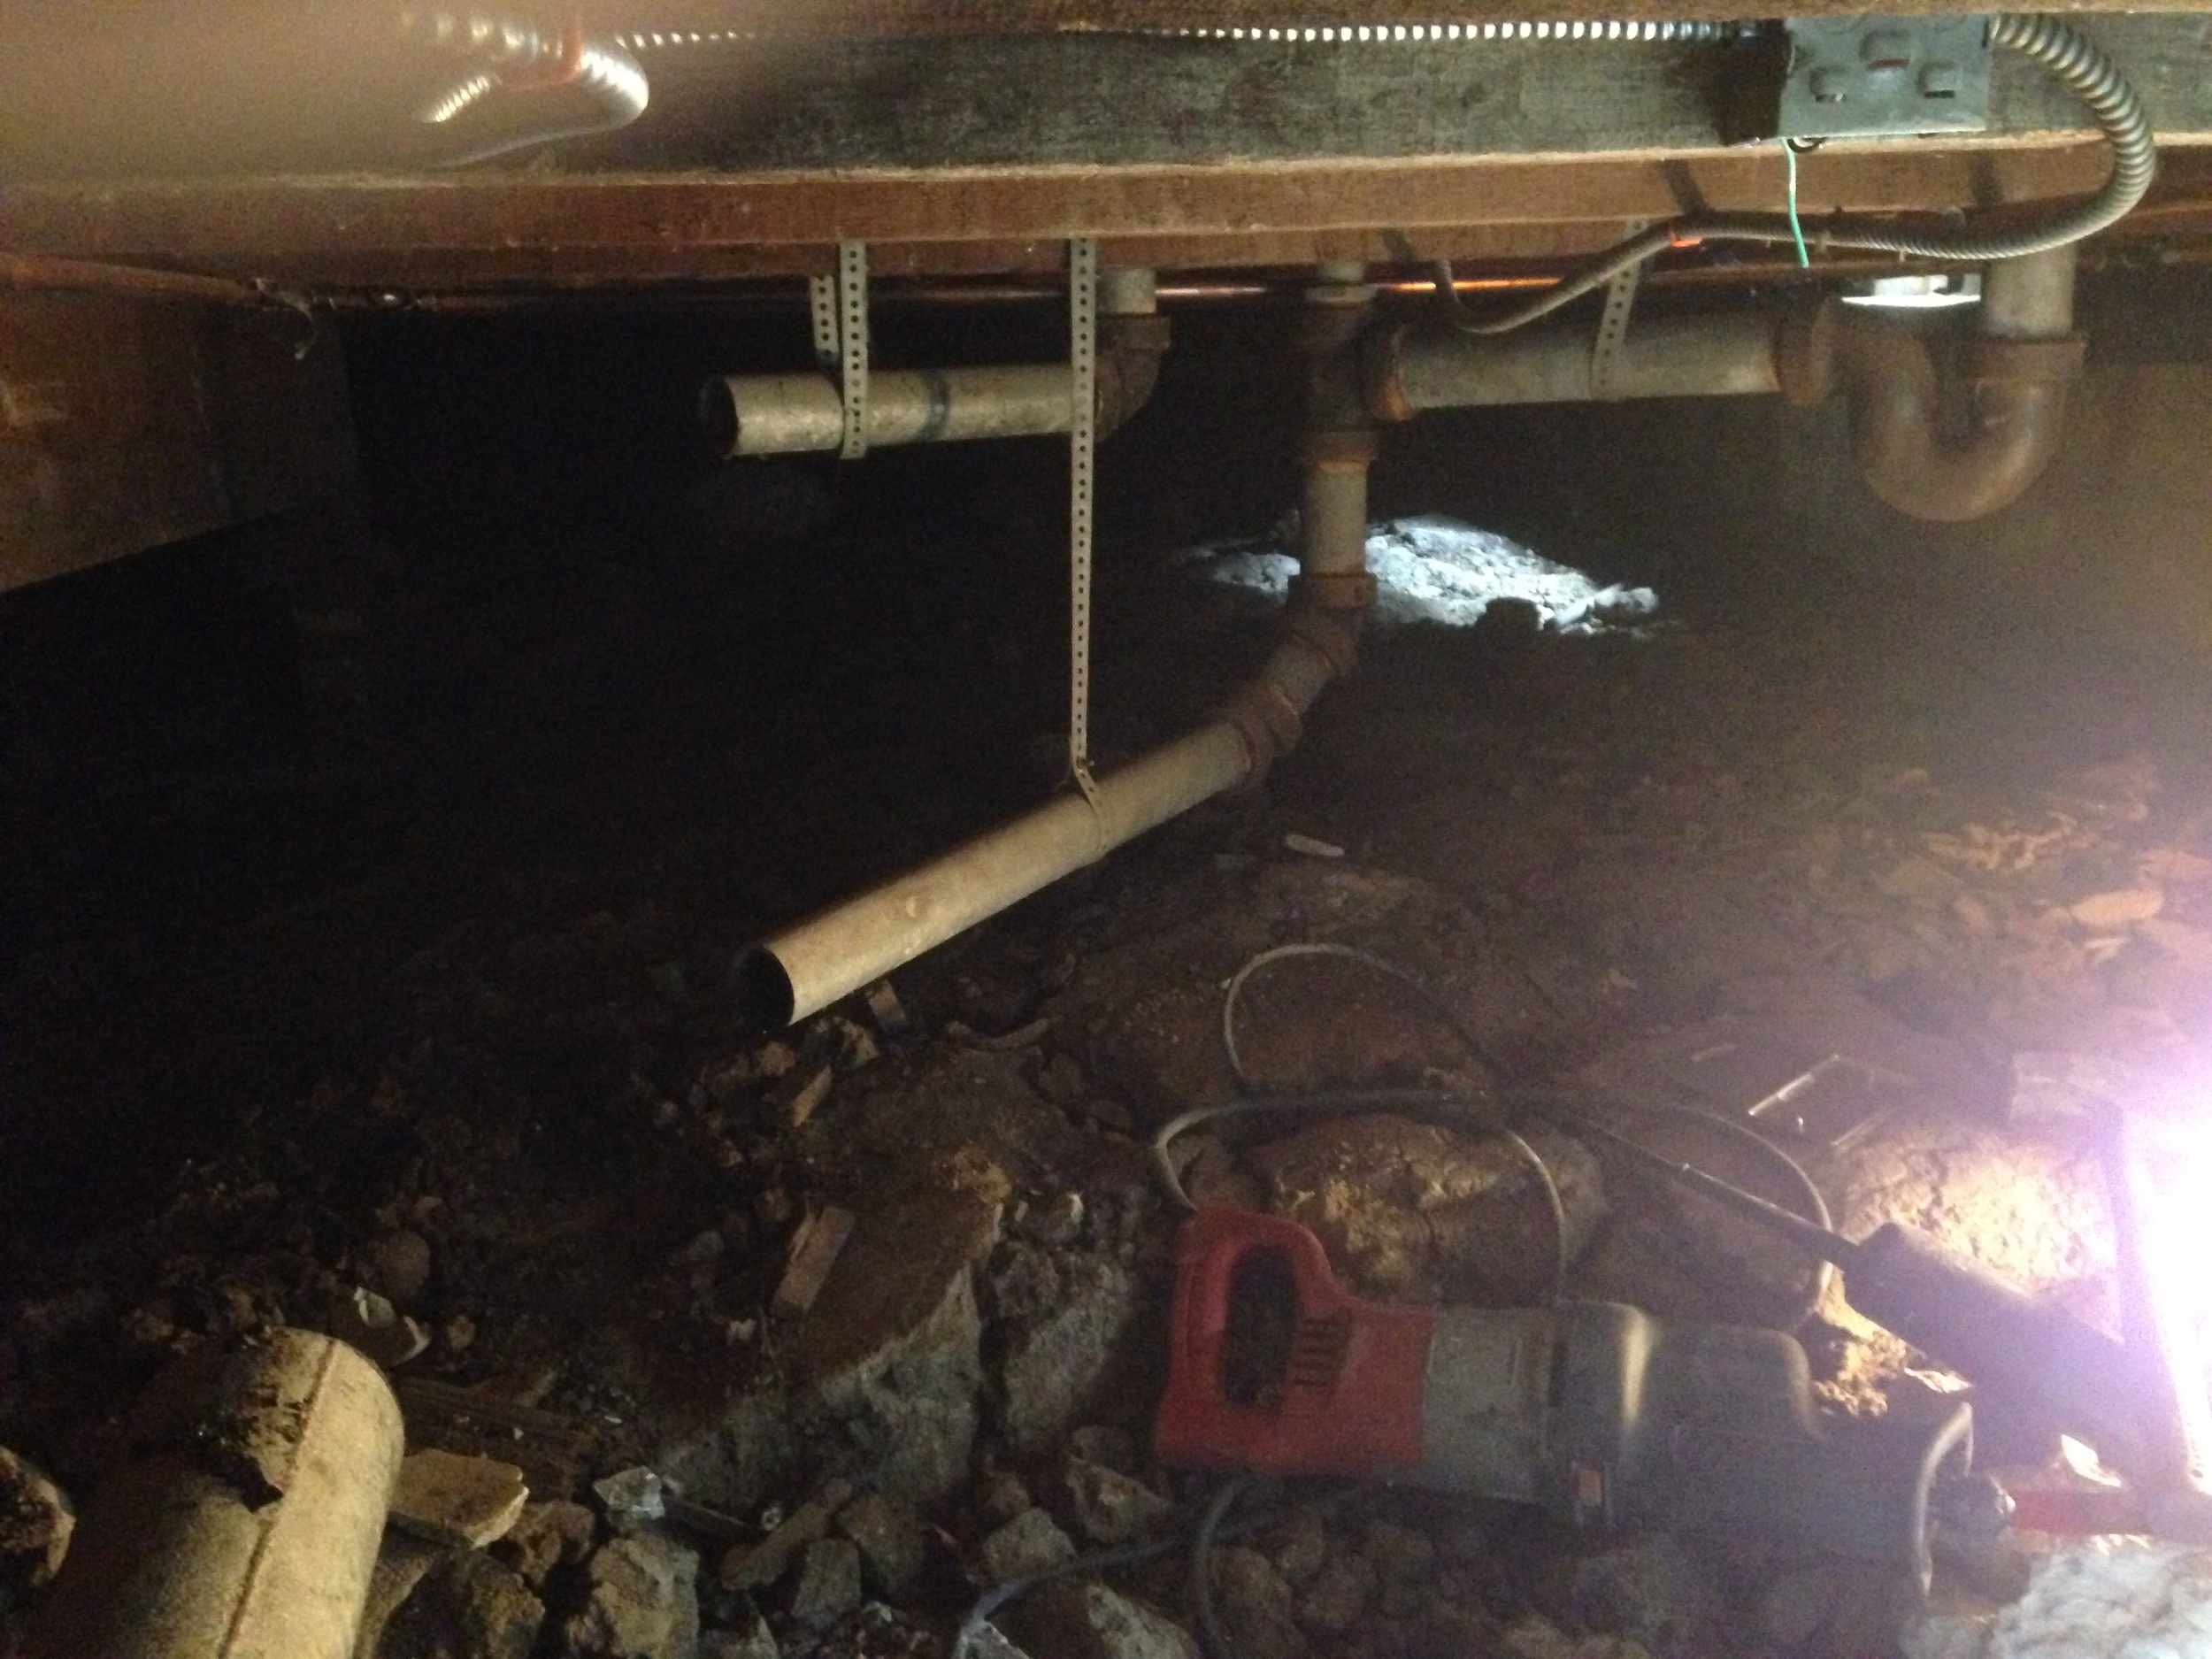
image.jpg
image.jpg
image.jpg
image.jpg

Getting there...

Clockwise from top center: 4" toilet drain, 2" toilet vent, 2" shower drain

Clockwise from top center: 4" toilet drain, 2" toilet vent, 2" shower drain

The 2" vent is now correctly out of the path of water from the toilet flush going down the 4" pipe. The vent is just for displaced air which is why it can have hard bends. The foreground 2" pipe is the shower drain.

The 2" vent is now correctly out of the path of water from the toilet flush going down the 4" pipe. The vent is just for displaced air which is why it can have hard bends. The foreground 2" pipe is the shower drain.

 
It's pretty funny to see the tiny 1 gallon toilet tank next to the old 3-5 gallon wall tank toilet. 

It's pretty funny to see the tiny 1 gallon toilet tank next to the old 3-5 gallon wall tank toilet. 


Got the toilet in... 


Maybeck Feature: Stucco Splatter

I didn't notice at first, but the house has an odd textured stucco splatter. This was a technique that only Maybeck used to my knowledge. It is one of my strongest pieces of evidence since it is so unusual and featured on confirmed Maybecks.

From the Berkeley Architectural Heritage Association: 

Daniella Thompson, BAHA 2006. Joralemon House, 1924

Daniella Thompson, BAHA 2006. Joralemon House, 1924

Ira B. & Dorothy Joralemon House
168 Southampton Avenue
(Bernard Maybeck, 1924)

"As part of a remodel of Bernard Maybeck’s 1924 masterpiece, the new owners rose to the challenge of restoring the unique, original exterior coating. Maybeck had prescribed “earth color,” a composition intermingling four colors of wet stucco—pale chrome yellow, deep ochre, Venetian red, and gray—to be spattered on the walls in turn. At Maybeck’s direction, the young Joralemons dipped whisk brooms into the mix and flipped them toward the walls, which scattered the colored stucco, creating what Maybeck called “vibrant colors.”

"About 15 years ago, because of cracking in the original finish, the exterior was covered with a layer of commercially sprayed stucco. Hidden behind a planter pot by the front entrance, the new owners found a patch of the original finish and color, and sought to recreate the look and technique, but more efficiently executed with sprayed paint.

"Faced with this intriguing challenge, their painting contractor enlisted the aid of a decorative painter known for her faux finishes. With air compressor, sheetrock hopper guns, and hoses, 100 gallons of paint were flung at the thousands of square feet of wall. After trial and error, the technique was refined and mastered, including brushes and sponges in the capable hands of the faux finisher. The result was a spectacular success, replicating the original look and returning Maybeck’s touch to the exterior of this very striking house."

-Berkeley Architectural Heritage Association 

http://berkeleyheritage.com/awards/awards2006.2.html

In the front of the house it looks like black speckle. I breezed by assuming it was mildew or something.


In protected areas, like under the kitchen balcony, it appears more pronounced. 


This small area off the laundry has some added colors:


Seen here is the black that's all over and a couple colors you can't see anywhere else - a buttermilk color and a terracotta red. It's hard to tell what was the intended effect of having more colors there. Best guess would be to blend with colors in the landscaping.

 
I even see the splatter on the original electrical permit which was in a box on the side of the house near the crawl space door! The first two sets of permits were under here. Looks like the electrical permit was near a gap in the door that covers t…

I even see the splatter on the original electrical permit which was in a box on the side of the house near the crawl space door! The first two sets of permits were under here. Looks like the electrical permit was near a gap in the door that covers the meter box.


Maybeck also used this type of splatter on the Oakland Packard dealership though this building is no longer around. 

"The dull surfaces of plastered walls never appealed to [Maybeck] and when he used stucco for reasons of economy he always attempted to enrich is by some means. The Jockers house (1911) had rough cast and contrasting troweled surfaces; the Kennedy studio used variously colored plasters without restraint. Most late houses, like the McMurray and the Staniford, had stucco exteriors modeled in several colors of plaster applied in successive dash coats. This method... produced a lively finish. But the hand-controlled application was not economical for use on large structures. A new technique, which covered concrete surfaces with a coat of plaster blown by air guns, took quantities of cement, pigment, and water, and mixed them as they were driven against the surface of the building. Maybeck saw that with this method he could vary the pigmentation of the plaster almost at will. He did so on the Oakland [Packard Dealership] building, first stationing himself across nearby Lake Merritt where he conducted the finishing operations by field telephone." Kenneth Cardwell from Bernard Maybeck / Arisan, Architect, Artist.

To sum up - the colorful stucco splatter is a distinctly Maybeck feature like the Venturi chimney. From what I can tell, the specific whisk broom splatter was done only in the '20s and only to dress up flat stucco exteriors (Maybe 3/4 or more of his projects from the -period were stucco). The Wallen #1 (1932) and J.B. Tufts #3 (1931) of the early '30s are simply plain stucco it appears.

I was lucky enough to see the 1921 Calkins house, and it seems like it is one of the few left with this finish that has not been painted. 

image.jpg
image.jpg
The streak is from a gutter that was in disrepair. 

The streak is from a gutter that was in disrepair. 

Sneaky Microwave Pantry Closet

I didn't want to change up the original redwood cabinets in the kitchen but the refrigerator was a problem. The space for it was 34" wide, 22" deep and a few inches too short for a standard fridge which is 70" I think. I was able to modify the cabinet above to get a few more inches in height. They do make a counter depth fridge which is 24" deep but a standard fridge is 30" deep. Common widths are 30", 36", 42" etc but a 33" is also made. 

We looked into 33"x24" size fridge but they have the about the same capacity as a standard 30"x30" fridge which is apartment sized and pretty small for a 3 bedroom house. My solution was to move the wall behind the fridge back so we could put in a 33"x30" which is a little bigger.

That left us with a tiny pantry closet and Christina came up with a clever solution. We found a 24"x48" rolling shelf from Costco that fits in there pretty snug. I had to put an outlet in the closet and I made a short extension cord to get power to the microwave. I had to also change the wheels to a smaller size so they wouldn't bind up on the walls. For light I put in a motion sensing LED which is perfect since there isn't a switch. It's a neat little system that saves limited counter space. I'm happy with how it turned out.

 
image.jpg
 

Panasonic Wall Whisper Fan

What do you do if you have exposed beam ceilings through most of the house and need ventilation?

No matter how historic your house, ventilation fans are critical for reducing moisture and odor. If you want your original bath to last forever, you need a vent fan. 

Fan retrofits can be tricky since houses weren't built with fans in mind. The standard vent fan is about 12"x12" and fits in the ceiling with a 4" vent duct to the outside. Two of our bathrooms have beam ceilings and the original bath, which we are trying to leave mostly original where possible, has a flat ceiling.

Therefore I was thinking we would need one ceiling vent fan and 2 wall fans for the beam ceiling bathrooms.

However, I cut a pilot hole where the fan would go in the original bath and there would be no room. 

Corner near the shower... The fan shouldn't be directly above the shower or the moisture will damage it

Corner near the shower... The fan shouldn't be directly above the shower or the moisture will damage it

Hard to see but the floor framing is shallow because the observation deck / master closet is above and there's a 2" vent pipe for the toilet going right through.

Hard to see but the floor framing is shallow because the observation deck / master closet is above and there's a 2" vent pipe for the toilet going right through.

So I will need 3 wall mount vent fans. I got three of the gold standard Panasonic Whisper line. These are expensive and the best deal I could get was 3 for $500. It's a lot of work to install a vent fan and you want it to last as long as possible so you should get a good one.  

Super nice Panasonic Wall Whisper fan. It's really cute, isn't it? 

Super nice Panasonic Wall Whisper fan. It's really cute, isn't it? 

image.jpg

It should fit nicely into the corner. 

 
It's venting out here near the top left corner of the window

It's venting out here near the top left corner of the window


The only problem with the whisper fan is that it's so quiet that people don't turn it off. I got a high tech switch so that it turns off automatically. You can get a moisture sensor built into the fan but this system is easier to service if the sensor fails. 

 
image.jpg
 

I'm getting ready to install this fan and sensor switch into the back bathroom after the plaster is done. I'll update this post if it doesn't work as well as expected but it should be the bees knees.